
Thursday, June 28, 2012
Reading...a bad BAD idea...
I thought I would get through at least half of the first binder we got....I however, was not anticipating the overwhelming feeling I got when faced with so much important information. It was scary and stressful and it has sort of nixed the good feelings I had going into our ultrasound appointment this afternoon. J has strict instructions not to let me word vomit all over the Dr. asking an obscene amount of questions...#1 being...should I REALLY read all of this information? Or is it better to just go with my instincts and trust that I won't shake my baby to make it stop crying, or leave my baby alone, unattended around sharp objects....
So with all that being said...my bonus sister L sent me a link {probably because I blew up her phone last night after reading} and guys...Huffington Post couldn't have made me any more at peace. These next 23 things that all new parents should know put me in a good mood and made everything a little lighter and not so scary! So without further ado...if you haven't seen the full article you can see it here. Enjoy!
1. The more time and effort put into decorating a nursery, the more likely that the baby will sleep in your room.
2. Things that don't wake a sleeping newborn: loud noises and bright lights. Things that do wake a sleeping newborn: sitting down to eat dinner.
3. Maybe they'll say it's the eyes. Maybe they'll say it's the mouth. Whatever it is, people will insist on telling you that your newborn looks like you. It's almost never true.
4. You may not want to cut your baby's nails because you are afraid of making her bleed. However, if you don't cut your baby's nails, she will probably scratch herself and, then, she'll bleed. So, why postpone the inevitable?
5. There is no greater thrill than the first time a baby calls out "mama" or "dada," even when it is directed toward the cat.
6. Sleeping a lot and eating a lot are traits highly cherished in babies. Unfortunately, neither are particularly admired in adults.
7. As a new parent, strangers will often approach you to ask, "Is she a good baby?" Surprise them by saying, "No, she's kind of an #$$hole."
8. You will discover that there must have been something very, very tricky about composing a melody for "Twinkle Twinkle Little Star," The ABC's," and "Baa Baa Black Sheep."
9. From the moment you arrive home from the hospital, you will be asked if your baby sleeps through the night. Tell them you don't know. Tell them you spend most nights out clubbing.
10. Make sure you learn all the noises that farm animals make. Even though most people no longer live on farms, the sounds that sheep, pigs and cows make are priority number one when teaching your little one to talk.
11. If she is wearing a nice outfit, it is likely that your baby will poop.
12. If you are wearing a nice outfit, it is likely that your baby will poop.
13. Despite advances in science, no one has figured out how to diagnose a dirty diaper besides sniffing at it or peeking in it. When you're in public, learn to do this discreetly.
14. Never in your wildest dreams (or worst nightmares) did you ever imagine how much you would be talking about poop. Unless you work for a laxative company. If you work for a laxative company, you are probably already talking about poop a lot.
15. Strangers are friendly when you're with with a baby. That said, strangers are even friendlier when you're with a puppy.
16. One of the surprise perks of having a baby? When you're with one, you can talk to yourself out loud and people don't look at you like you're crazy.
17. Everyone tells you to "sleep when the baby's sleeping." It's good advice. But, remember, it's "sleep when the baby's sleeping... unless the baby fell asleep in the car and you're driving."
18. Don't beat yourself up over every little thing. Babies have really low expectations.
19. If you think you might be posting too many pictures on Facebook, you probably are.
20. No matter how much you love your child, naptime is never long enough.
21. When people come to visit in the first weeks after you come home from the hospital, remember they are there to see you and the baby. Remember they don't expect you or your house to look perfect. And remember, if you are talking anywhere near the baby monitor, there's a good chance they can hear you.
22. The secret to being a good parent? There isn't one. Anyone who tells you otherwise is lying.
23. When all else fails, if you can't stop your baby from crying, turn on some music and dance around the living room. Even if the crying doesn't stop, at least you'll enjoy yourself.

Thursday, June 21, 2012
Crib Bedding Project of the Century
We were in the store for all of about 10 minutes when I found the base fabric. Let me preface this story by saying that I found the BEDDING OF MY DREAMS online {picture below} however...when added all up came close to $600....I'm sorry but that is the cost of the crib that I like and I can't justify spending THAT much on just bedding...especially bedding that BD is probably going to poop, pee and throw up on....
 |
| {Via: Carousel Designs} |
 |
| This is the base print |
 |
| Boy option with Navy Blue Ticking |
 |
| Girl option with pale pink ticking |
I just adore ticking. It is the striped fabric that we will be using as an accent. In the 1800s and 1900s the navy ticking was used for pillows and mattresses where we use cotton today. I think it is really neat that it has a history and a story...like so many other pieces in our home.I will use the ticking for the crib skirt, bumper ties as well as an accent pillow for the rocker [and maybe some DIY art on the wall but you'll have to stay tuned to find that out!}.
The printed fabric will make up the majority of the room. I will use it for the crib quilt, the bumpers {except for the ties} as well as the curtains.

Using a pattern makes it much easier. The back of the pattern has each piece labled...A, B, C, D, etc. Beside each of the letters (for those of you who are non sewers) it tells you how much fabric you need as well as any additional materials{ie: batting for the quilt or velcro for the bumper} If you get hung up or have questions, just comment and I'll do the best that I can to help!
I think we are going to be able to make a high quality bedding, in the colors and patterns that I want for 1/4 of the price. PLUS I know 100% without a doubt that I am getting exactly what J and I have been dreaming and talking about since we found out we were expecting little BD!
Stay tuned for pictures and stories :)
{DIY Davis Style}
HD
Thursday, June 14, 2012
DIY Pallet Wine Rack


Also before you start staining I would sub set some screw holes along the top board, that way while you're staining you can make sure to get in those crevices so they are much less noticeable. For those of you who do not know how to sub set a screw...you need to get your drill and use the bit that makes a pre-hole in the wood (not a phillips head or flat head bit) It sort of looks like one of those lollypops from Disney...sort of spiral type shape. So drill with a big bit first about halfway through the wood...this will let the screw sink in to the hole...that way it won't be flush with the wood {therefore hidden a little bit!} then take your smaller drill bit and sink the hole the rest of the way through your board.
Start staining! I chose the Dark Walnut stain because the rack is going in our kitchen and our cabinets and floor are both dark wood and I just adore dark wood! I used a sponge brush just because I love that they cover more easily and don't give you the streaks like a paintbrush does.


 |
| Excuse my toes....at least they're painted! |


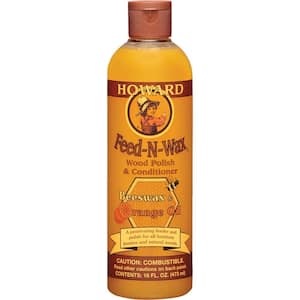 it is almost $8 BUT I hardly used any to get this result which means I have TONS left over for my future projects! I rubbed it into the wood with an old sock {I would shy away from using a paper towel just because, since I didn't sand the pallet it still has a lot of rough edges and once that paper towel rips and is stuck in a splinter it is a pain to go through and pick out!}This product is great for sealing in the stain and although I didn't think it was possible it also helped to bring the grain of the wood out even more. The undertones are much more of a honey color and the dark oak parts aren't so heavy. An oil or wax like this is purely up to your discression. Minwax also makes a "finishing" product similar to this but it is closer to $10 and I think there is something to be said for a natural beeswax product. But you be the judge!
Hope you find this helpful! I absolutely adore my new wine rack and it fits perfectly into our home...it looks like it has been there forever. Post questions or comments below!
Keep on keepin' on!
{DIY Davis Style}
HD
And baby makes three...
Okay guys...remember that Blog Hiatus I took? I tolddd you I had a REALLY good reason to be so MIA for the past 2 months....are you ready for it? As if the title doesn't give it away...right?
J and I are expecting our first baby in January 2013!!!!

Remember when I went home for my bonus sister's baby shower? Well we ALLLL know that I have had baby fever forever and when my sister and I were in Target buying the essentials to make a baby emergency kit (which I have provided the contents of below) we decided a card was also necessary and guys....I lost my sh*t in the baby card aisle.... I couldn't stop crying for no apparent reason {I'm not talking cute little tears....I'm talking like...face scrunched up...ugly...horrific....my entire family and extended family just died an unexplaned death...crying} and I just summed it up to being REALLY beyond happy for Laura and Jordan...after all, they are like family. My sister B taunted me saying that I was going to have to chronicle the next 9 months because for sure I was going to end up on that terribly cliche "I didn't know I was pregnant" show...which petrified me. For the next two weeks I couldn't stop obsessing over it. Any time I talked to my mother it was all I could talk about and ask about. Finally she said to me "Haleigh...calm down. If you would be pregnant your chest would be so sore that Josh couldn't even hug you" that put me at ease...all was normal on that front...until the next day. I woke up and didn't feel the greatest so J gave me a hug...and holy moly I pushed him off so fast I think his head is still spinning.
That day after work {we decided on Spaghetti night...it was our 7 month wedding anniversary} I had to swing by the grocery on my way home just for some garlic bread....and a home pregnancy test....or 4.I got home and took the first test...while I was on the phone with Josh's mom talking about the best way to make meatballs I am staring at the test...pregnant.
It literally took everything I had not to spill the beans to his mom and then my mom and dad {whom I also polled on the best recipe for meatballs} J walked in the door to see papers saying Welcome Home Daddy on the floor...and me sitting in the winged back chair...pregnancy test in hand.
He walked in and stood there for a minute...looked at the papers on the floor and looked and me confused...then looked back to the floor {poor thing...he just didn't get it} until I held up the test and said guess what....
J thought that the welcome home daddy was from the dogs....what a man {rolls eyes}
So now...without further ado...
Baby Emergency Diaper Bag/Kit
Here's what you'll need:
Diaper Bag or Container {we used a Tupperware since L drives a lot...it needed to fit in her trunk and be easily organized...and see through}
Diapers {Size 1 and Size 2....don't want her growing out of her kit!}
1 Pack of wipes in a soft case {don't want them taking up too much room!}
A clean outfit
2 pacifiers in their own case
Boogie Wipes {Grape scented}
An Interactive Toy
Baby Orajel {for teething}
Baby Ibuprofine
Puffs {The natural flavored snacks}
Johnson & Johnson Set {Lotion/shampoo/oil}
Whatever else you think your mommy friend could use...keep in mind expiration dates and temperature limits. Obviously if this mommy to be is living in Florida she mayyy not want to keep the medicines or lotions in the heated trunk.
Other things we thought about including but didn't:
Baby nail clippers
Thermometer
Hair Bows
Hand Sanitizer {for mommy after changing an extra icky diaper}
A Burping Blanket
An Extra Bottle and measured amount of formula {just add water}
A bottle of water
Until next time...
{DIY Davis Style}
HD
Baby Orajel {for teething}
Baby Ibuprofine
Puffs {The natural flavored snacks}
Johnson & Johnson Set {Lotion/shampoo/oil}
Whatever else you think your mommy friend could use...keep in mind expiration dates and temperature limits. Obviously if this mommy to be is living in Florida she mayyy not want to keep the medicines or lotions in the heated trunk.
Other things we thought about including but didn't:
Baby nail clippers
Thermometer
Hair Bows
Hand Sanitizer {for mommy after changing an extra icky diaper}
A Burping Blanket
An Extra Bottle and measured amount of formula {just add water}
A bottle of water
And there you have it! A DIY baby emergency diaper bag/kit. I'm sure you all will be seeing lots of baby related posts coming your way....consider this fair warning :)
Until next time...
{DIY Davis Style}
HD
Monday, June 4, 2012
Blog hiatus...
Here's a picture to tide you over...me holding my "niece" for the first time...I was talking to her when they took the picture....(and I had also just spilled red slurpee all down my white shirt so I'm practically naked in this picture....wearing just a white camisole) Classy...I know

Until next time...
DIY Davis Style
HD
Subscribe to:
Posts (Atom)