
Wednesday, February 29, 2012
30 Day Challenge {Day 4}
These are my parents! We'll all them BS...hahahah just kidding...but
really...their initials are B & S. B is a dentist in Virginia and S
is my mom...she is the office manager at my Dad's office. We'll just go with The Daddy and The Mommy for identity's sake
 |
| B & S in Saint Martin |
The Daddy is
pretty much a super man if there ever was one. He is a jack of all
trades and I am not sure there is anything he can't do. I like to think I
was on the receiving end of his desire to do everything..all at once. I always have a 3 page long to do list of running projects, and even though he is a Dentist, that doesn't stop him from doing a ton of other really awesome things like stained glass, woodwork, "farming"...I say "farming" in quotes like that because when he was little he spent his summers on the Myers family farm in Illinois (being a Florida boy) he always talks really fondly of "The Farm". So naturally when they decided to move us as a family from Florida to Virginia we moved onto a "Farm"....he built two "barns" and a greenhouse. Notice I am putting all of these things in "Quotes"...because they aren't what you would typically think of. Our "farm" is 92 acres of land situated on the back of a mountain in Virginia. The "barns" are basically big tool sheds where he works on his bazillion projects. So see all the wood in the picture below? It covers the entire house...
 |
| A picture of the Daddy's stained glass work...and see all that wood? |
When The Daddy and The Mommy bought all this land it was all trees...with The Daddy's skills, he cut down, planed and coated all the wood so it could be used in the house!Whenever people ask me about him I always feel like I say...oh yeah..he's a dentist BUT...haha
The Mommy is pret-ty amazing too. She was my high school cheerleading coach and everyone loved her. She's fun, creative, outgoing and the list goes on and on. When my sister B and I were little (yes we actually do call her B...just the letter...not the cheese) if we ever came to her and said...Mommah we're bored, you know what she would do? She would whip out a piece of poster board, and markers from her secret Mommy stash and tell us to pick a theme and make up a board game.
 |
| The Mommy & I on my Wedding rehearsal day! |
B & I would spend hours creating rules, playing cards and finding miscellaneous items that we could use for board game pieces. The mommah didn't just leave us to do all of this alone...I remember one time we created a "ZOO" themed board game and neither B or I were very skilled in our drawing at this age (9 and 10) so she created these amazing pictures on our poster board. One of a tiger, and a huge elephant head...think Dumbo's circus here. And even some other small circus themed thing like peanuts and popcorn. It was seriously awesome. And when The Mommy wasn't drawing really cool things she was teaching us how to cook a Thanksgiving Day meal or how to do a DIY furniture painting.
So I s'pose it is safe to say that I come by my DIY Crafting skills honestly...and my OCD/AR skills? Those come from The Mommy :)
{DIY Davis Style}
HD

Tuesday, February 28, 2012
30 Day Challenge {Day 3}
 |
| Anna Maria Island, Florida Aerial View |

Enough boring/mushy stuff :) stay tuned for Day 4! {Tomorrow haha}
{DIY Davis Style}
HD
Sunday, February 26, 2012
30 Day Challenge {Day 2}
Day 2: The Meaning of the name behind your blog...
Today's post is going to sort of double up. First I'll do the challenge THEN I'll tell you about my latest addiction in money saving...
If you all have read my very first post introducing myself then you all know WHY I started this DIY Blog...if not, you should really go check it out :). I spent an entire week maybe an hour or so trying to come up with something catchy and witty. I posted a few different options on my facebook to get some feed back..."The DIY Den" "The Davis' Den" "The DIY Project" and "DIY Davis Style" and as you can see...DIY Davis Style stuck. Davis is my new married name...although maybe it isn't so new anymore...after almost 5 months {this Thursday!!!*Squee!*} So that's where the Davis part came from and the DIY is pretty self explanatory...Do It Yourself. I was sick of seeing other blog sites telling you how easy it was and making it seem like practically zero work AND making it seem like it was cheap! So I started this to chronicle my projects and to help others like me find a realistic source!
Now...my newest addiction. I am sure some of you have heard of the website Ebates? No? I just joined right before Christmas and I am LOVING it. Here's how it works...you go onto their site which looks like this:

Once you're there over to the left you'll see a category list of allll the different stores that are members. Now this is my MOST favorite part....you see those RED Percentages? {JC Penney 6.0% Cash Back} well if you click on the store..we'll use ASOS {one of my most FAVORITE online stores...it's a UK site and has TONS of trendy beautiful clothing and accessories...} for this example. Ebates will direct you to the ASOS website where you can do your normal online shopping. The redirection notice will pop up and look like this:

Then you just shop like normal. At the end of your shopping it calculates your 7.0% or whatever the percentage is AND
THEY SEND YOU A CHECK. I am not kidding....Ebates should pay me for this
shameless plug but I am OBsessed.
We needed a new computer so I shopped through Ebate's and got our brand spankin' new Dell all in one and got a check a few weeks later. Christmas shopping? I got paid back :) Now...it isn't a HUGE amount of money...I think we only got $16.00 back from buying our computer through them...but what if I had gone to a box store....I would have paid the exact same and not gotten ANYTHING back...so $16....I'll take it! It will tell you what the percentage back is before you click on it...it usually ranges from 3% to around 7%. Annnnndddd I even added a little button over on my side bar so you can check it out...or you can click here. Shameless plug over....now back to shopping for J's bday present :) muah ha ha ha {that's my evil laugh....}
{DIY Davis Style}
HD
Saturday, February 25, 2012
30 Day Challenge {Day 1}
As I was laying in bed last night after a nice dinner date to Chili's and one of the surrounding malls with the hubs I was contemplating my 15 interesting facts {read: Day 1: Introduce, recent picture of yourself, 15 interesting facts} and I thought...hm...I guess it isn't really day one and I have ALREADY efficiently turned a 30 day challenge into a 31 day challenge...well crap. And then I fell asleep not coming up with ANY of my 15 facts so, as always...I'm just going to wing it! Here we go?
 | |
| Recent Picture: with our Husky, Diogi...he is the biggest baby EVER |
15 Interesting Facts:
1. I wore glasses from the age of 5 until I was 21 and went through with Lasik
2. I am an aggressive person but HATE confrontation
3. I am a hopeless romantic
4. I can get through multiple books in one sitting on my nook{gotta love chick-lit}
5. When I was 17 I moved away from home to go to college in Florida
6. 2 years later without telling my parents, I withdrew from school, applied in Art School, did my phone interview and got accepted....THEN told my parents :)
7. I HAVE to have my toenails painted at ALL times
8. My feet are always cold {I am sure there is no correlation between this and #7...I hope}
9. I have a birthmark on the back of my leg in the EXACT same spot as my Daddy's
10. I am accident prone, if there is something to trip/fall/hit myself on it will happen
11. My jaw has been locked "from stress" since August....that's 6 months
12. Yes I went to school for Fashion...no I am not an idiot {people seem to get these confused}
13. I have a "Do it right now and Do it right the first time" type personality that is genetic
14. I am VERY organized in everything but my home it seems....
15. My husband and I dated for a very brief 6 months in High School and if you would have told me back then that I would end up marrying him almost 10 years later I would have laughed in your face :)
Hope those were interesting enough! Stay tuned tomorrow for day 2...
{DIY Davis Style]
HD
Friday, February 24, 2012
30 Day Challenge...{accountability}
Well hello there blog world. Yesterday I had a mid day doctor's appointment and then took the rest of the day off work. It was a gorgeous Carolina day...75 degrees! IN FEBRUARY! It was amazing. It gave me a renewed sense of energy and when my feet hit the floor this morning it was definitely a morning when the Devil said "Oh Crap...she's up". I decided today I will be uber productive and complete all these little projects I have laying around. It was 70 degrees at 7:30 this morning when I got in my car and headed to work, I cut on pandora and it was playing all of my favorite songs...seriously {ie: Walkin on Sunshine the Aly & AJ version, Beverly Hills by Weezer, Sum 41...} . I know I selected the playlist but it hasn't been playing these songs all week and today of all days it plays all my favorites BACK TO BACK! :) The world is on my side today....
So...with this renewed sense of energy that I have {read: paragraph 1} I have decided to do the inevitable...a 30 day challenge! I haven't ever done one of these but I think it will give me a litttle accountability with this whole blog thing. PLUS I promised you all a little bit of lifestyle with all these DIY Goodies. Here's how it works....{This is Day 0 in case you didn't get that...}
Day 0: The 30 Day Challenge Explanation and Description
Day 1: Introduce, recent picture of yourself, 15 interesting facts
Day 2: Meaning behind your blog name
Day 3: Your first love
Day 4: Your parents
Day 5: A song to match your mood
Day 6: A picture of something that makes you happy
Day 7: Favorite movies
Day 8: A place you've traveled to
Day 9: A favorite picture of your best friend
Day 10: Something you're afraid of
Day 11: Favorite tv shows
Day 12: Something you don't leave the house without
Day 13: Goals
Day 14: A picture of you last year - how have you changed?
Day 15: Bible verse
Day 16: Dream house
Day 17: Something you're looking forward to
Day 18: Favorite Place to Eat
Day 19: Something you miss
Day 20: Nicknames
Day 21: Favorite Picture of yourself ALL TIME Why?
Day 22: What's in your purse?
Day 23: Favorite Movie
Day 24: Something you've learned
Day 25: Put your iPod on shuffle, first 10 songs
Day 26: Your Dream Wedding
Day 27: Original Photo of the city you live in
Day 28: Something that stresses you out
Day 29: 3 Wishes
Day 30: a picture of yourself this day and 5 good things that happened since you started the challenge
So here it goes...say a little prayer for me and stay tuned for the next 30 days of amazing-ness!
Wednesday, February 22, 2012
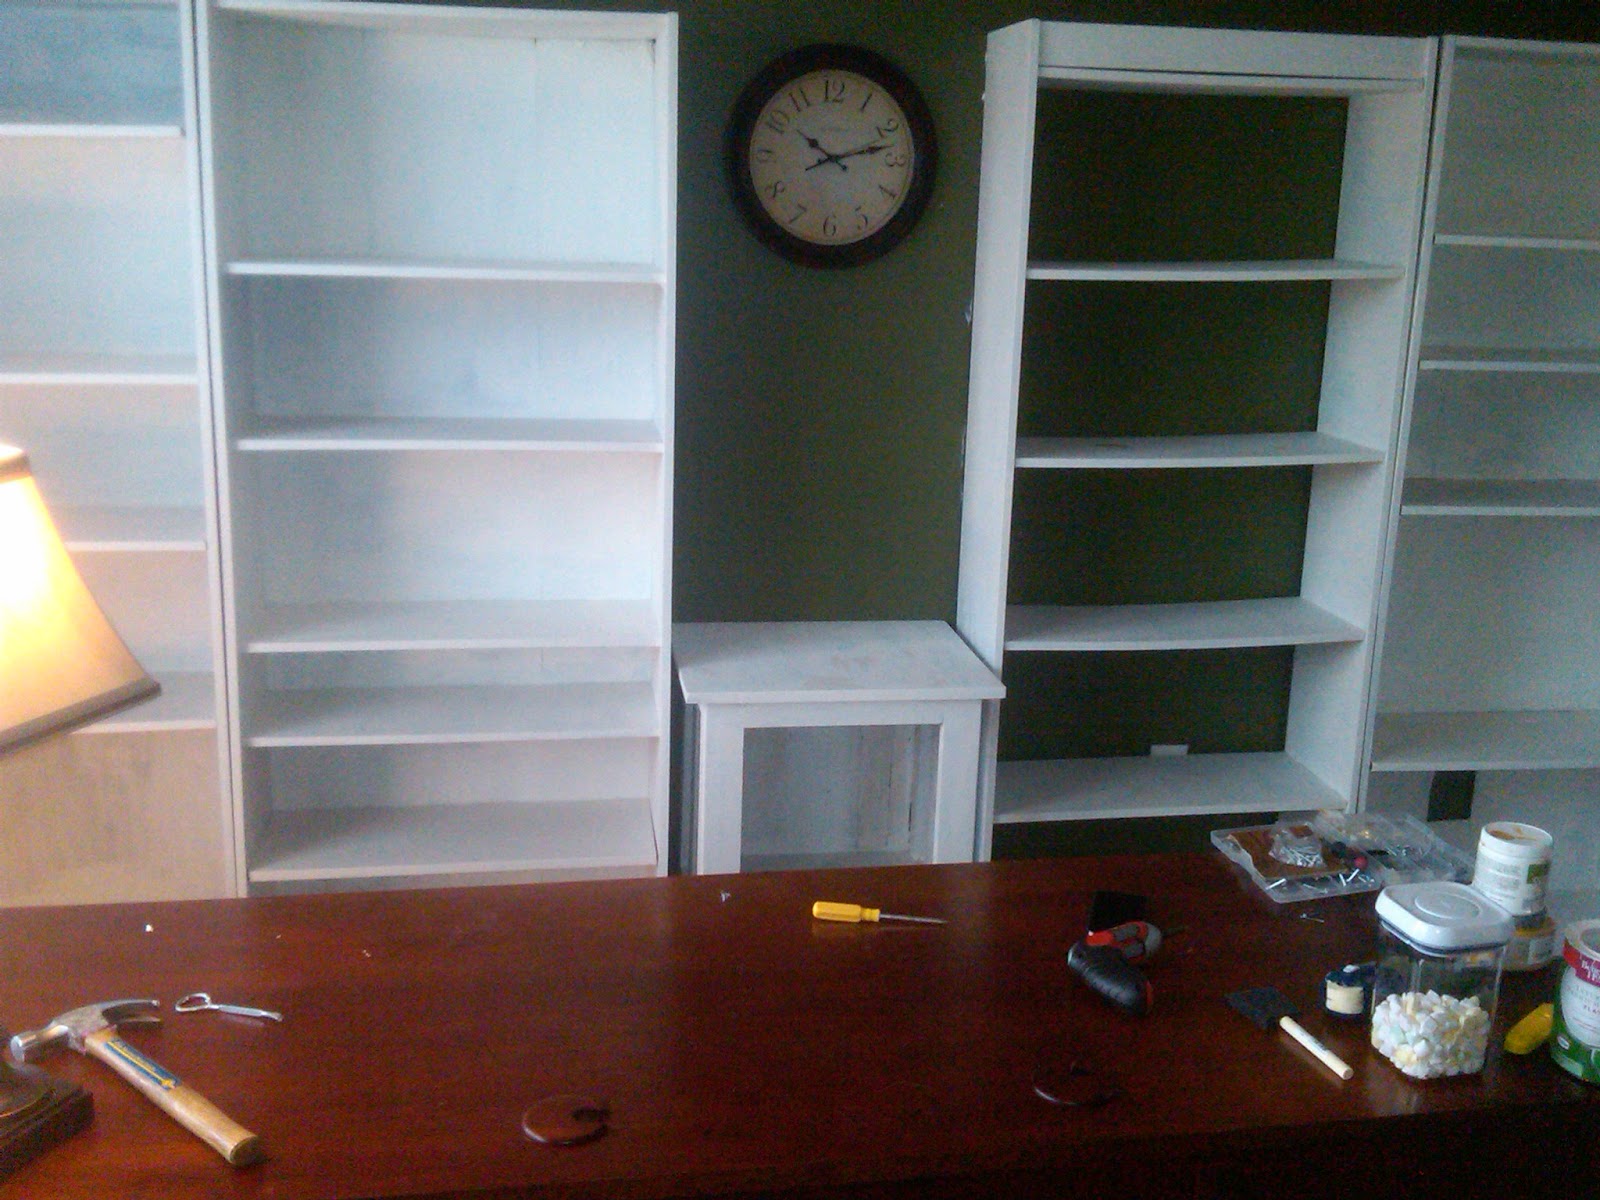
Bookshelves..Part 2 {FINISHED!}
Okay...SO...the blessed things are FINALLY finished. What was supposed to be a one weekend project has managed to take up almost an entire month! Do you remember this very first post: Unsuccessful Project #1 or how about post number 2: Shelf Assembly Pitfalls... orrrr how about number 3: 1.5 ?
Well...as you can see... to say these have been a challenge would have to be a massive understatement. Not just because they are heavy and came with zero directions but because I failed miserably at the thing I do best....Planning! I didn't think about drying time or having to do multiple layers of paint PLUS the finish, or that I should have though of all of these things before I ever even started. But all of these woes are a thing of the past...#ThankBabyJesus
Here goes...I finally got them all "installed" and painted with 2 coats of the white paint I showed you in 1.5. Since they didn't have to be a solid white for the finish I was doing on them I wasn't so concerned with the patchy-ness of the shelves. If you want a pure white shelving system I would suggest just purchasing them in white...butttt if you want to go the complicated route...do it like I have. If you have never seen any of my other projects you know that I DIE for anything and everything shabby chic. Here is a picture of what the boring bookcases looked like when they were first installed-with the two coats of paint-no stain yet. From the next few pictures you can also see that amazing green color I told you all about...{Dark Eucalyptus Leaf}
The shelves did not take up the entire back wall so I had a small table I used when I was in college. When I purchased it from a gem of a local shop back in Harrisonburg, Virginia, it wasa horrifically ugly wood tone. I then painted it black {back then I was in to super modern furniture} and now it is white...
So starting off, here is what you'll need, a stain of your choice, some
of the $.69 foam brushes and some paper towels. I have tried using many
things and although the paper towel pills and sometimes breaks apart it
really is the best for the desired effect. This is the type of stain you will need, MinWax which can be
purchased at *big box hardware store*. I went with Jacobean because it
had a nice green undertone. Make sure when you are looking at stains you
realllyyy take note of what color undertone they have. The first pieces
of furniture I used this finish on turned out pink....I used a
"Mahogany" stain...it was nooooo bueno. Also when shopping for a stain, do NOT get a huge gallon of it because a little bit goes a VERY long way-and if you are like me you will use it for multiple different projects!
Here are the steps! STEP ONE: Spread it:
 Like I said above...with this type of stain there really is no way you can mess it up, if you get one spot that you feel like is too dark, just sand over it to your desired color OR you can paint a little bit of white back over it! {easy peasy} Soak your brush and try to squeeze off the excess using the can...not your hands {Stain is true to its name...it STAINS...EVERYTHING}You might also want to be wearing some gloves...if you're messy like me and just don't care then prepare to
 have stain on your hands/arms/legs/chest for a week at work...scrub the top two layers of skin off :)
Once your sponge brush is soaked you can do two different things, depending on how dark you want the stain. The first option being this..Just throw some stain on there which will give you a darker color OR you can dab your papertowel on your foam brush to transfer the desired amount of stain...then scrub the living heck out of it! {depending on how dark you want it} either let it sit a minute or two {for a darker stain} or immediately wipe it off for just a tint. I did the latter of the two. Since the walls in the office are such a dark green and the desk is also a dark wood color I wanted to be sure that it wasn't too dark in there and that the shelves had that shabby chic look I was going for. I am going to keep saying this...YOU CANNOT SCREW IT UP...I promise! If it is too dark for you, just grab your fine grit sanding block and go over it a few times. The nice thing about this option is that even if some of the wood shows through that is great because it adds to the charm.

 If you are wanting the same look I went with then you will want to take the edge of your brush {remembering that if you aren't getting much stain out of it you need to re-dip it back into your stain can} and go JUST along the edges when you have reached your desired stain wash on the rest. I like this effect a lot because it give it a touch of primitive. *DO NOT WIPE THIS OFF* The point of the edging is to give the edges more depth and to look more distressed, as if you sanded through the white paint through to a darker wood. Make sure when you are doing this effect you will want to hit ever single edge. If you screw up...just wipe it off with your papertowel {it will stain the wood still but it will look more natural} then start over again. I promise it will be worth it in the end when you see the finished product and get to enjoy this awesome project in your home! Comment with questions...and ignore the paint all over my hands...I OBVIOUSLY
 neglected decided not to wear gloves :) I like to feel my hands in the paint...plus I promised you the pretty AND the ugly ;)
 |
| Excuse my mess on the desk... |
 |
| Angle 2 |
The shelves did not take up the entire back wall so I had a small table I used when I was in college. When I purchased it from a gem of a local shop back in Harrisonburg, Virginia, it was
 |
| Add caption |
Here are the steps! STEP ONE: Spread it:
 |
| Take your brush and just throw some stain on there...Don't be shy! |
 Like I said above...with this type of stain there really is no way you can mess it up, if you get one spot that you feel like is too dark, just sand over it to your desired color OR you can paint a little bit of white back over it! {easy peasy} Soak your brush and try to squeeze off the excess using the can...not your hands {Stain is true to its name...it STAINS...EVERYTHING}You might also want to be wearing some gloves...if you're messy like me and just don't care then prepare to
 Once your sponge brush is soaked you can do two different things, depending on how dark you want the stain. The first option being this..Just throw some stain on there which will give you a darker color OR you can dab your papertowel on your foam brush to transfer the desired amount of stain...then scrub the living heck out of it! {depending on how dark you want it} either let it sit a minute or two {for a darker stain} or immediately wipe it off for just a tint. I did the latter of the two. Since the walls in the office are such a dark green and the desk is also a dark wood color I wanted to be sure that it wasn't too dark in there and that the shelves had that shabby chic look I was going for.
 I am going to keep saying this...YOU CANNOT SCREW IT UP...I promise! If it is too dark for you, just grab your fine grit sanding block and go over it a few times. The nice thing about this option is that even if some of the wood shows through that is great because it adds to the charm.
 If you are wanting the same look I went with then you will want to take the edge of your brush {remembering that if you aren't getting much stain out of it you need to re-dip it back into your stain can} and go JUST along the edges when you have reached your desired stain wash on the rest. I like this effect a lot because it give it a touch of primitive. *DO NOT WIPE THIS OFF* The point of the edging is to give the edges more depth and to look more distressed, as if you sanded through the white paint through to a darker wood. Make sure when you are doing this effect you will want to hit ever single edge. If you screw up...just wipe it off with your papertowel {it will stain the wood still but it will look more natural} then start over again. I promise it will be worth it in the end when you see the finished product and get to enjoy this awesome project in your home! Comment with questions...and ignore the paint all over my hands...I OBVIOUSLY
I am now the proud..DIYer...of an almost complete office. Bring on the photos you say?..stay tuned for a fully accessorized and clean office...it may be a few days...
As always....good luck my DIYers.
{DIY Davis Style}
HD
UPDATE*** Here are pictures of the completed bookshelves! Comment and let me know what you think!

 I'm thinking about some fake ferns on top but J says no....what do you think?
As always....good luck my DIYers.
{DIY Davis Style}
HD
UPDATE*** Here are pictures of the completed bookshelves! Comment and let me know what you think!

Saturday, February 18, 2012
DIY Magnetic Chalk Board!! "Christie Style"
So when asked to do a DIY project and document it, I must say, it seemed a little daunting at first! However, I knew almost immediately what I was going to do! I have been wanting a magnetic chalkboard to put on my fridge for some time now. I wanted to have it all nice and pretty and not to mention… I wanted some “bling” to it. I had been searching Etsy for a while, and I could never find one that fit my needs that wasn’t around $30-$35 so I decided that I would take on this project!
I have to tell you here… I had awesome intentions to use the wooden dowels that you will see pictured… but those didn’t work out too well.. haha!
I went to the *Big Name Craft Store* and purchased everything I knew I would need for the project. Minus the magnets because I already had those at the house. I didn’t want to spend more than $20.00 on a project so I was quite pleased with my total coming out to $18.55!! I had a 20% off coupon that I was able to use, along with a couple of items that were on sale!!

CHECK OUT THE SAVINGS!! I am quite pleased with that!

I
gathered my materials. I purchased an 18 x 18 square wooden board, the
chalkboard spray paint, the wooden dowels, the chalk, and of course… I
can’t neglect the “bling” aspect!! THE HOT PINK GLITTER RIBBON!!! YAY!

I
learned a while ago that you should NEVER spray paint without gloves
on… that stuff is REALLY hard to get off of your hands!! So, it is
wise to have disposable gloves on. I always keep these in the house
because when I clean, my hands dry out.

This
is when I set to work.... and yes, in the above picture, you will also
see a trash bag. Make sure that you have an open space with lots of
ventilation when you are spray painting. Those fumes are TOXIC!! It
worked out perfectly that it was a decent (although chilly) day, so I
was able to utilize my backyard for this.
I laid out my trash bag, and placed the 18 x 18 wood board on top of it, and went to town with the Chalk Board spray paint. It doesn't take much, but I like to make sure that I have all of my bases covered. So I did three coats of it. I let it dry about an hour between each coat of paint I sprayed.
I laid out my trash bag, and placed the 18 x 18 wood board on top of it, and went to town with the Chalk Board spray paint. It doesn't take much, but I like to make sure that I have all of my bases covered. So I did three coats of it. I let it dry about an hour between each coat of paint I sprayed.

Here
is where the wooden dowel debacle ensued. This was the most time
consuming and stupid decision I had... because I didn't think before
hand! (you can't buy 18" wooden dowels, and expect them to frame your
18 x 18 board perfectly....) I painstakingly wrapped 4 - 18" dowels
with the nice hot pink glittery blingy ribbon (THANK goodness I
purchased two spools of it!). This took FOREVER!!
 I
let the board dry for 24 hours (which is the recommended time that was
listed on the Chalkboard Paint Spray can) and went to work... that's
when the "DUH CHRISTIE!!" moment occurred... So I nixed the sparkly
ribbon wrapped dowel idea and went with a MUCH easier and in my
opinion... a prettier "frame"!
I
let the board dry for 24 hours (which is the recommended time that was
listed on the Chalkboard Paint Spray can) and went to work... that's
when the "DUH CHRISTIE!!" moment occurred... So I nixed the sparkly
ribbon wrapped dowel idea and went with a MUCH easier and in my
opinion... a prettier "frame"!  I
glued (with regular Tacky Glue! That stuff is AWESOME!) the ribbon
directly to the board!!! and... I still got to use my sparkly hot pink
ribbon!!
I
glued (with regular Tacky Glue! That stuff is AWESOME!) the ribbon
directly to the board!!! and... I still got to use my sparkly hot pink
ribbon!!
After I finished the gluing of the ribbon, I trimmed the edges and let it dry for about an hour! Then I was able to flip the board over and get to work on gluing the magnets to the back of the board.
 Just a little dab of glue!
I used a lot of magnets.. I just didn't want it sliding down the fridge!

And then you are READY to display your Menu, Messages. or notes to yourself written in fun chalk colors!!!

And
it's easy peasy to wipe down! Just with a damp wash cloth or sponge!
It will erase the chalk and you have a clean slate to work with again!
I guess I could have just used a plain old dry erase board that you can purchase at the dollar store, but I like the creativity of the chalk board... and the decorations... :-)
I LOVE IT!!! and not to mention, it's kinda fun to draw with the colored chalk on it. oh... and those stupid dowels..... They have become magic wands for my nieces and my best friend's children! I added some more pink ribbon to the ends of them so that they were "flowy"... and so they didn't go to waste and the time was well worth it to see them smile!

Thursday, February 16, 2012
Post-Valentine's Day Post
Now
that I have regained my sanity I thought I would talk about Valentine's
Day {Just like the other 5billion people in the Facebook/Blog world}. I
always buy J a present and he always sayyysss he loves it but I thought
back to our first year of dating and how much he loved the things I
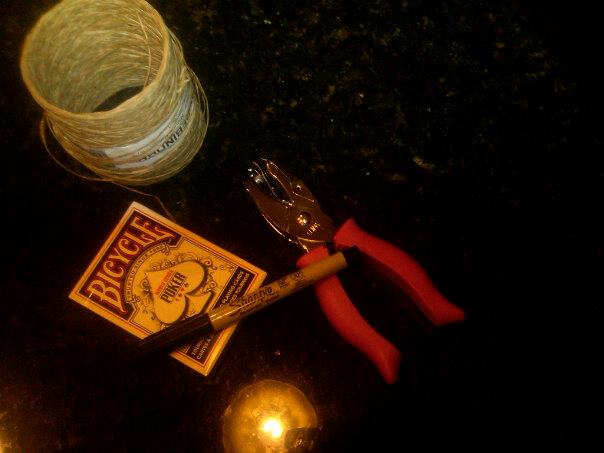
hand made. SO...that's what I did! I got on the flytrap that is called
Pintrest and wasted spent an entire day
a few hours looking at all the different cute craft-y ideas that didn't
look too hard or time consuming since I just got off one show and have
another one in like...30 days. I decided on a box with 1 year's worth of
pre-planned dates {didn't do the pre-paid because the rates are ever
changing down here...plus...that would have been expensive} in addition
to a little booklet of 52 reasons why I love him, on a deck of playing
cards.
 | |
| Here's what you'll need... |
 |
| The rafia covered floral wire. Tied in loose knots. |
 |
| Make sure you write something on the front |
 Once I had them tied together I went through my list of 52 reasons and picked longer ones which I wrote on the 2, 3 and 4 cards {since there was more room on those cards} and I used the shorter more typical things {your baby blues etc.} on the face cards. So minus the time consuming-hand cramping hole punching and the monotonous "I Love You" that I wrote on each card PLUS the 52 reasons...labor of love? The best part about this gift? Watching J go through and read each card. When he got to the card that said "Your Baby Blues" he got this confused look on his face....he says "Baby Blues...I thought you were the one with baby blues" and I had to squeeze my legs together so I wouldn't pee myself before I told him the card was referring to his eyes...and it's called baby FEVER not blues...
{11 Pre-Planned Dates}

And to think...I made him these beautifully amazing things...and all I got was this lousy ring ;)

{DIY Davis Style}
HD
Subscribe to:
Posts (Atom)