
Thursday, June 28, 2012
Reading...a bad BAD idea...
I thought I would get through at least half of the first binder we got....I however, was not anticipating the overwhelming feeling I got when faced with so much important information. It was scary and stressful and it has sort of nixed the good feelings I had going into our ultrasound appointment this afternoon. J has strict instructions not to let me word vomit all over the Dr. asking an obscene amount of questions...#1 being...should I REALLY read all of this information? Or is it better to just go with my instincts and trust that I won't shake my baby to make it stop crying, or leave my baby alone, unattended around sharp objects....
So with all that being said...my bonus sister L sent me a link {probably because I blew up her phone last night after reading} and guys...Huffington Post couldn't have made me any more at peace. These next 23 things that all new parents should know put me in a good mood and made everything a little lighter and not so scary! So without further ado...if you haven't seen the full article you can see it here. Enjoy!
1. The more time and effort put into decorating a nursery, the more likely that the baby will sleep in your room.
2. Things that don't wake a sleeping newborn: loud noises and bright lights. Things that do wake a sleeping newborn: sitting down to eat dinner.
3. Maybe they'll say it's the eyes. Maybe they'll say it's the mouth. Whatever it is, people will insist on telling you that your newborn looks like you. It's almost never true.
4. You may not want to cut your baby's nails because you are afraid of making her bleed. However, if you don't cut your baby's nails, she will probably scratch herself and, then, she'll bleed. So, why postpone the inevitable?
5. There is no greater thrill than the first time a baby calls out "mama" or "dada," even when it is directed toward the cat.
6. Sleeping a lot and eating a lot are traits highly cherished in babies. Unfortunately, neither are particularly admired in adults.
7. As a new parent, strangers will often approach you to ask, "Is she a good baby?" Surprise them by saying, "No, she's kind of an #$$hole."
8. You will discover that there must have been something very, very tricky about composing a melody for "Twinkle Twinkle Little Star," The ABC's," and "Baa Baa Black Sheep."
9. From the moment you arrive home from the hospital, you will be asked if your baby sleeps through the night. Tell them you don't know. Tell them you spend most nights out clubbing.
10. Make sure you learn all the noises that farm animals make. Even though most people no longer live on farms, the sounds that sheep, pigs and cows make are priority number one when teaching your little one to talk.
11. If she is wearing a nice outfit, it is likely that your baby will poop.
12. If you are wearing a nice outfit, it is likely that your baby will poop.
13. Despite advances in science, no one has figured out how to diagnose a dirty diaper besides sniffing at it or peeking in it. When you're in public, learn to do this discreetly.
14. Never in your wildest dreams (or worst nightmares) did you ever imagine how much you would be talking about poop. Unless you work for a laxative company. If you work for a laxative company, you are probably already talking about poop a lot.
15. Strangers are friendly when you're with with a baby. That said, strangers are even friendlier when you're with a puppy.
16. One of the surprise perks of having a baby? When you're with one, you can talk to yourself out loud and people don't look at you like you're crazy.
17. Everyone tells you to "sleep when the baby's sleeping." It's good advice. But, remember, it's "sleep when the baby's sleeping... unless the baby fell asleep in the car and you're driving."
18. Don't beat yourself up over every little thing. Babies have really low expectations.
19. If you think you might be posting too many pictures on Facebook, you probably are.
20. No matter how much you love your child, naptime is never long enough.
21. When people come to visit in the first weeks after you come home from the hospital, remember they are there to see you and the baby. Remember they don't expect you or your house to look perfect. And remember, if you are talking anywhere near the baby monitor, there's a good chance they can hear you.
22. The secret to being a good parent? There isn't one. Anyone who tells you otherwise is lying.
23. When all else fails, if you can't stop your baby from crying, turn on some music and dance around the living room. Even if the crying doesn't stop, at least you'll enjoy yourself.


Thursday, June 21, 2012
Crib Bedding Project of the Century
We were in the store for all of about 10 minutes when I found the base fabric. Let me preface this story by saying that I found the BEDDING OF MY DREAMS online {picture below} however...when added all up came close to $600....I'm sorry but that is the cost of the crib that I like and I can't justify spending THAT much on just bedding...especially bedding that BD is probably going to poop, pee and throw up on....
 |
| {Via: Carousel Designs} |
 |
| This is the base print |
 |
| Boy option with Navy Blue Ticking |
 |
| Girl option with pale pink ticking |
I just adore ticking. It is the striped fabric that we will be using as an accent. In the 1800s and 1900s the navy ticking was used for pillows and mattresses where we use cotton today. I think it is really neat that it has a history and a story...like so many other pieces in our home.I will use the ticking for the crib skirt, bumper ties as well as an accent pillow for the rocker [and maybe some DIY art on the wall but you'll have to stay tuned to find that out!}.
The printed fabric will make up the majority of the room. I will use it for the crib quilt, the bumpers {except for the ties} as well as the curtains.

Using a pattern makes it much easier. The back of the pattern has each piece labled...A, B, C, D, etc. Beside each of the letters (for those of you who are non sewers) it tells you how much fabric you need as well as any additional materials{ie: batting for the quilt or velcro for the bumper} If you get hung up or have questions, just comment and I'll do the best that I can to help!
I think we are going to be able to make a high quality bedding, in the colors and patterns that I want for 1/4 of the price. PLUS I know 100% without a doubt that I am getting exactly what J and I have been dreaming and talking about since we found out we were expecting little BD!
Stay tuned for pictures and stories :)
{DIY Davis Style}
HD
Thursday, June 14, 2012
DIY Pallet Wine Rack


Also before you start staining I would sub set some screw holes along the top board, that way while you're staining you can make sure to get in those crevices so they are much less noticeable. For those of you who do not know how to sub set a screw...you need to get your drill and use the bit that makes a pre-hole in the wood (not a phillips head or flat head bit) It sort of looks like one of those lollypops from Disney...sort of spiral type shape. So drill with a big bit first about halfway through the wood...this will let the screw sink in to the hole...that way it won't be flush with the wood {therefore hidden a little bit!} then take your smaller drill bit and sink the hole the rest of the way through your board.
Start staining! I chose the Dark Walnut stain because the rack is going in our kitchen and our cabinets and floor are both dark wood and I just adore dark wood! I used a sponge brush just because I love that they cover more easily and don't give you the streaks like a paintbrush does.


 |
| Excuse my toes....at least they're painted! |


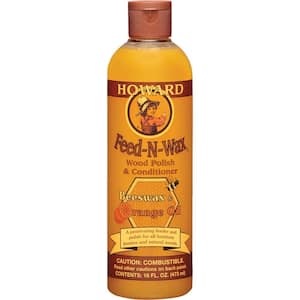 it is almost $8 BUT I hardly used any to get this result which means I have TONS left over for my future projects! I rubbed it into the wood with an old sock {I would shy away from using a paper towel just because, since I didn't sand the pallet it still has a lot of rough edges and once that paper towel rips and is stuck in a splinter it is a pain to go through and pick out!}This product is great for sealing in the stain and although I didn't think it was possible it also helped to bring the grain of the wood out even more. The undertones are much more of a honey color and the dark oak parts aren't so heavy. An oil or wax like this is purely up to your discression. Minwax also makes a "finishing" product similar to this but it is closer to $10 and I think there is something to be said for a natural beeswax product. But you be the judge!
Hope you find this helpful! I absolutely adore my new wine rack and it fits perfectly into our home...it looks like it has been there forever. Post questions or comments below!
Keep on keepin' on!
{DIY Davis Style}
HD
And baby makes three...
Okay guys...remember that Blog Hiatus I took? I tolddd you I had a REALLY good reason to be so MIA for the past 2 months....are you ready for it? As if the title doesn't give it away...right?
J and I are expecting our first baby in January 2013!!!!

Remember when I went home for my bonus sister's baby shower? Well we ALLLL know that I have had baby fever forever and when my sister and I were in Target buying the essentials to make a baby emergency kit (which I have provided the contents of below) we decided a card was also necessary and guys....I lost my sh*t in the baby card aisle.... I couldn't stop crying for no apparent reason {I'm not talking cute little tears....I'm talking like...face scrunched up...ugly...horrific....my entire family and extended family just died an unexplaned death...crying} and I just summed it up to being REALLY beyond happy for Laura and Jordan...after all, they are like family. My sister B taunted me saying that I was going to have to chronicle the next 9 months because for sure I was going to end up on that terribly cliche "I didn't know I was pregnant" show...which petrified me. For the next two weeks I couldn't stop obsessing over it. Any time I talked to my mother it was all I could talk about and ask about. Finally she said to me "Haleigh...calm down. If you would be pregnant your chest would be so sore that Josh couldn't even hug you" that put me at ease...all was normal on that front...until the next day. I woke up and didn't feel the greatest so J gave me a hug...and holy moly I pushed him off so fast I think his head is still spinning.
That day after work {we decided on Spaghetti night...it was our 7 month wedding anniversary} I had to swing by the grocery on my way home just for some garlic bread....and a home pregnancy test....or 4.I got home and took the first test...while I was on the phone with Josh's mom talking about the best way to make meatballs I am staring at the test...pregnant.
It literally took everything I had not to spill the beans to his mom and then my mom and dad {whom I also polled on the best recipe for meatballs} J walked in the door to see papers saying Welcome Home Daddy on the floor...and me sitting in the winged back chair...pregnancy test in hand.
He walked in and stood there for a minute...looked at the papers on the floor and looked and me confused...then looked back to the floor {poor thing...he just didn't get it} until I held up the test and said guess what....
J thought that the welcome home daddy was from the dogs....what a man {rolls eyes}
So now...without further ado...
Baby Emergency Diaper Bag/Kit
Here's what you'll need:
Diaper Bag or Container {we used a Tupperware since L drives a lot...it needed to fit in her trunk and be easily organized...and see through}
Diapers {Size 1 and Size 2....don't want her growing out of her kit!}
1 Pack of wipes in a soft case {don't want them taking up too much room!}
A clean outfit
2 pacifiers in their own case
Boogie Wipes {Grape scented}
An Interactive Toy
Baby Orajel {for teething}
Baby Ibuprofine
Puffs {The natural flavored snacks}
Johnson & Johnson Set {Lotion/shampoo/oil}
Whatever else you think your mommy friend could use...keep in mind expiration dates and temperature limits. Obviously if this mommy to be is living in Florida she mayyy not want to keep the medicines or lotions in the heated trunk.
Other things we thought about including but didn't:
Baby nail clippers
Thermometer
Hair Bows
Hand Sanitizer {for mommy after changing an extra icky diaper}
A Burping Blanket
An Extra Bottle and measured amount of formula {just add water}
A bottle of water
Until next time...
{DIY Davis Style}
HD
Baby Orajel {for teething}
Baby Ibuprofine
Puffs {The natural flavored snacks}
Johnson & Johnson Set {Lotion/shampoo/oil}
Whatever else you think your mommy friend could use...keep in mind expiration dates and temperature limits. Obviously if this mommy to be is living in Florida she mayyy not want to keep the medicines or lotions in the heated trunk.
Other things we thought about including but didn't:
Baby nail clippers
Thermometer
Hair Bows
Hand Sanitizer {for mommy after changing an extra icky diaper}
A Burping Blanket
An Extra Bottle and measured amount of formula {just add water}
A bottle of water
And there you have it! A DIY baby emergency diaper bag/kit. I'm sure you all will be seeing lots of baby related posts coming your way....consider this fair warning :)
Until next time...
{DIY Davis Style}
HD
Monday, June 4, 2012
Blog hiatus...
Here's a picture to tide you over...me holding my "niece" for the first time...I was talking to her when they took the picture....(and I had also just spilled red slurpee all down my white shirt so I'm practically naked in this picture....wearing just a white camisole) Classy...I know

Until next time...
DIY Davis Style
HD
Monday, April 30, 2012
Check Your Pockets
If you saw my last post then you knew this one was coming! Check your pockets, for the laundry room...what a cute idea! I have seen those really cute pallet signs on Pintrest and I just adore them. However, fitting a few pallets in a Honda Civic Hybrid just ain't happenin'.
So I used the extra wood from my last project, this was a super quick
and easy project. Took me probably only about 20 minutes and cost me the
cost of paint and screws which I already had!

Step One: Stick together.
The two black pieces were the sides of the upper small drawers and the other sections are assorted scrap wood from the dresser. I chose to leave the pieces long so that the dove tailing would stick out on the sides. I started with 2 backing boards and decided to place a third one...better to be safe than sorry!

Then I purchased some Glidden Onyx samples from Wal-Mart around $3 each and grabbed my art paint brush and went to town!

The finished product! Super easy and SUPER cute!

Happy Crafting!
{DIY Davis Style}
HD
DIY Laundry Station
Hi Everyone! So I know I told you I
would be doing the pallet wine rack next but this was too exciting not
to tackle this weekend and share with you-I will post the wine rack this week along with the Check your Pockets sign I made with the scrap wood from this project! Here's how the idea started. We moved in June 2011 and I said I was going to decorate everything..all at
once. We all know how that ended...
Step One: Disassemble the drawers
Then I decided...one room at a time. This was the winner... I have been putting the
laundry room off because I was convinced my VERY busy {understatement of
the year} Daddy was going to build me the laundry station of my dreams. Aaaannndd now we know how that one turned out.
I don't know about you all but all the women in my immediate family me, my mom and my sister,
are SUPER crafty and I called my sister up to talk about this
super-awesome-laundry station that Daddy was going to build...thinking
she would have some crafty inspiration and something I may not have
thought of. This is the big 'un...she imparts on me the IDEA of the century.
She goes on to tell me that her in-laws are gifting
them a dresser...a really cool one. And how bad would it be if she wanted
to completely take it apart and turn it into something else? Not at all! I tell her...mainly because I want to hear the super-trifecta-of-amazingness that she is about to spill. She says...here's
what I want to do....I want to take the top off and add a piano hinge
so it can open and close. Then I want to take the front plates of the
drawers and nail them shut so it still looks like a dresser...just no functioning
drawers. THEN I want to add laundry sorting bags. Guys...this.is.genius
So of course I had
to find a dresser ASAP and try this beauty of an idea for our disaster of a complicated laundry room..and that brings
us here. B has not yet made her masterpiece but I am here to show you
mine, in the hopes that she...and you will have an easier time of
it! I googled how to take the top off a dresser and got no where so
here are the steps so that you too, can have your own Laundry sorting station.
My goal was to hide our dirty laundry {literally} and to have a hard surface where I could fold so I could stop using our 2nd guest room as my folding room.
Here goes!
Here's what you will need...
A dresser {I found my on Craigslist for $50, paid a friend's gas to get it to my place $25}
Screws
Screwdriver
Piano Hinge of appropriate length
Canvas or vinyl sorting bags {measure your dresser before you buy}
Grammets & Grammet maker {if you want that extra touch to your sorting bags}
12 Mug Hooks
Hammer
Crowebar
A dresser {I found my on Craigslist for $50, paid a friend's gas to get it to my place $25}
Screws
Screwdriver
Piano Hinge of appropriate length
Canvas or vinyl sorting bags {measure your dresser before you buy}
Grammets & Grammet maker {if you want that extra touch to your sorting bags}
12 Mug Hooks
Hammer
Crowebar
A before & after shot...they look the same you say? Well...they are supposed to...
 |
| Before |
 |
| After |
I did this step first because it seemed the least daunting of all the tasks that lie ahead. I was accurate...
 |
| My drawers were dove-tailed so extra hammering was necessary |
 |
| You can just pull the drawer our completely to check what type of drawer you have... |
Once you have just the plates you will want to start on the top.


When tossing your scrap wood on the ground be sure to remove any nails that may still be in the sides...I learned this the hard way. Hoping that I don't have to get a tetnus shot...

Not all dresser tops are created equal. Some are nailed from the top, some have wood braces like that that are screwed or nailed in and some are just screwed. It would have been awesome of this one would have been the screw in kind but alas, it was not. The bracket was nailed AND glued in...that sucker was not going anywhere...

So here's what I did, I took a flat head screwdriver and hammered a little, then pried. Then hammered a little and pried...this is where I stepped on the nail and after struggling for about 30-45 minutes I gave up and took a trip to big box hardware store to get something a little more heavy duty, in addition to some other things {we'll leave out the part that I left with flowers and boxwoods}
Enter....large prying tool....
 Once the drawers are out you have a much easier access to the top but it still isn't ideal. This is where patience is a huge virtue. Don't get overwhelmed but also, walk away if it is ticking you off! It's not a big deal if you take a short break and come back to this project with a renewed sense of perseverance. Again with the hammer and pry, hammer and pry, hammer and pry. Do just a little bit at a time because the last thing you want to do is completely ruin the top!
Ahhhh Sweet Success!!
 Originally I was planning to use two decorative hinges...the pretty ones you can find at Big Box Hardware Store. However, after talking to my elders {including my Mom & Dad} they tell me I should really use a piano hinge instead. Why? You ask? Well I asked, 2 separate hinges might not support the weight of the top and it won't be as sturdy, while a piano hinge {because of its length} will distribute the weight more evenly. You can only get piano hinges in long strips so be sure to measure the length of your dresser before heading to said store.
My particular hinge came with the small screws in these really annoying tubes...but 99.9% of the time it will come with screws so don't worry about finding miniature ones.

After a few minutes of deciding "what's next" I decided that putting the hinge on the lid first was the safest decision. The way that the back of the dresser was designed I was not able to put the other half of the hinge on the inside like most piano hinges are. The part of the hinge screwed to the lid was on the inside while the part screwed to the dresser was on the outside. This was okay for me because you won't ever see the back of the dresser as it will be up against a wall. So, I did the lid first then set it back on the base just like it would look and I started at the ends and worked to the middle screwing on the hinge to the base of the dresser.

And check out my big girl drill...yep...that's right...it's DeWalt and pret-ty bad a** if you know what I mean! It's not too big or heavy and it came with an awesome carrying case, extra battery, charger and I even got two accessory kits. Can't stop a girl from getting her accessories. I got one case of drill bits in assorted sizes and one case of...other bits? It has the extender, and phillip's head/flat heads in different sizes. *In love*

See that bar across the middle? It wasn't weight bearing which means it really served no purpose now that the drawers were out so I sawed that baby in half and took it out.
Here is where the project got on my bad side. I don't have an electric nail gun....or wood clamps.
After struggling for what seemed like hours (long enough that I eventually just about lost day light) I gave up and called my Dad. I was all but whimpering into the phone because I got a splinter in my eye, cut my finger and dropped a few boards on my head. He says that simple solution and I think...well why the heck didn't I think of that...

He suggested that I nail in some boards to the back, then nail the drawers to the boards. This.Was.Genius. and like I said, I'm not sure why I didn't think of such a simple brilliant idea before. I think I was just so content on nailing them shut not using anything else that I didn't even think to just use more wood. Now don't get all hippy skippy and run to the hardware store, just use some of the scrap wood from the drawers. {Save the rest because I'm going to do another little cutie of a project with the leftovers!}
 |
| I ran out of daylight...literally |
Once the drawer fronts are secured you are pretty much done! All that's left now are the sorting bags and mug hooks to go on the inside and your little station is complete! Now see the bottom part of my dresser? It was the same tan as the top and I just thought it looked like it was unfinished. SO I got some black paint {Glidden samples for $3 at Wal-Mart} and painted 2 coats to make it look more finished. I also used that paint on the inside of the dresser lid and around the edges so when I opened it, it was also more finished on the inside.
Step Four: Add Mug Hooks

You will want to put the drill bit tip on your drill so that you can pre-drill a few holes. This makes screwing in the mug hooks MUCH easier. I measured the length of the dresser and decided how far apart I needed my hooks to be to hang the bags on.

Step 5: Find Your Bags
 Originally I thought I had found the perfect canvas bags at Wal-Mart for around $8 each...but I got them home and they didn't work, so I had to take them all the way back and return them. So I decided on an "early" "quick" trip to Ikea...yeah right. There is no such thing as a quick trip to Ikea. Especially when you decide 5 minutes before you go that you are going to completely re-do your entire laundry room. Needless to say, I found these guys...Antonius. They actually have a frame that you buy for them to go in but they were perfect. They came in white or black but since black was sort of the theme, and will get less dirty...I went with black. They are also almost a vinyl type material which I loved because if they get wet, or spilled on or dirty, they don't stain!!!
 So here I have the bags already in. I have a grammet maker from when I was a fashion student and used that. If you don't have a grammet maker, they are pretty cheap at any craft store, only about $12 I think. Or, you can get a metal punch tool that you use with a hammer, just depends on which way you want to go. I went with small grammets, that way the bags don't slouch as much. Needless to say, I am VERY pleased with the end result. I ended up putting it just outside our laundry room in the hall because our laundry room is super small, but it is perfect and already has some dirty laundry in it. Compliments of J...
 |
| Whites, Darks & Lights |
So try it out! Let me know if you try it and how you like it. I love having a custom piece with hidden uses. Happy Crafting!!
Stay Tuned for the "Check Your Pockets" sign made from the scrap wood of this project, it will be up on the blog shortly!
Until next time...
{DIY Davis Style}
HD
Subscribe to:
Posts (Atom)