Thursday, June 14, 2012
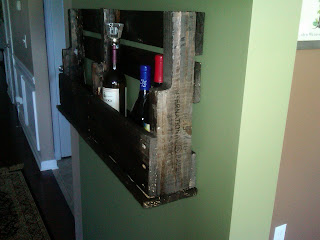
DIY Pallet Wine Rack
I think I have mentioned a few times that Minwax is like my most favorite brand of stain. They have so many different color options and they come in small sample jars {good for distressing furniture} or these large cans {if you plan on staining an entire piece of furniture}
Before you start staining up a storm {this is definitely a personal preference} for me I needed it more distressed. More dinged and dented up. My personal preference is a chain but other wood or a hammer will work just fine. Make sure no matter what you are using that you hit the wood hard enough to get the gouge you want but not so hard as to break the wood {my sister found this out the hard way}. I chose not to sand mine down too much, just mostly the roughest corners...if you're anything like me I tend to run into things if they protrude from the walls and I just knew I would walk into this one day.
Also before you start staining I would sub set some screw holes along the top board, that way while you're staining you can make sure to get in those crevices so they are much less noticeable. For those of you who do not know how to sub set a screw...you need to get your drill and use the bit that makes a pre-hole in the wood (not a phillips head or flat head bit) It sort of looks like one of those lollypops from Disney...sort of spiral type shape. So drill with a big bit first about halfway through the wood...this will let the screw sink in to the hole...that way it won't be flush with the wood {therefore hidden a little bit!} then take your smaller drill bit and sink the hole the rest of the way through your board.
Start staining! I chose the Dark Walnut stain because the rack is going in our kitchen and our cabinets and floor are both dark wood and I just adore dark wood! I used a sponge brush just because I love that they cover more easily and don't give you the streaks like a paintbrush does.
I started at the bottom and worked my way up, that way when I flipped it over to do the sides and back, the front was basically dry. The thing about stain is...you want to leave it on for a few minutes...long enough for the wood to absorb as much of it as it will hold, then you want to wipe it. If you don't wipe it and get the excess stain off then your piece will be sticky...and no one wants sticky furniture...and once it's sticky...there's no going back unless you re-sand the ENTIRE piece.
My most favorite thing about this piece {besides the fact that it is a re-used piece of pallet, and that I was able to distress it even more} is the natural wood grain that the stain brought out. Looking at the pallet before you wouldn't have seen all the graining, but after the stain soaked in, it was like a new piece of wood! Here are a couple of shots of the graining {because I was a little obsessed with how it came through}
 |
| Excuse my toes....at least they're painted! |
The only downside that I have found to this particular rack is that it is not very wide...so those big liter bottles of wine do not fit. {Not that we all buy wine by the liter...right?}
I am completely thrilled with how this came out....Do you see that sheen on the wood? I popped by Home Depot and got this AMAZING product. It's Howard Feed-N-Wax 16 fl. oz. Wood Polish and Conditioner
Hope you find this helpful! I absolutely adore my new wine rack and it fits perfectly into our home...it looks like it has been there forever. Post questions or comments below!
Keep on keepin' on!
{DIY Davis Style}
HD
Subscribe to:
Post Comments (Atom)


love this! sooo want to make one - yours is gorgeous!
ReplyDeleteThank you! It was super easy...but I definitely suggest using the wax at the end, it made a huge difference! Happy crafting!
ReplyDelete